few days back i gone through a html/javascript iphone optimized photo gallery at http://www.jaipho.com/
Really cool way to create a gallery that looks awesome on smart phone.
What if you can create this gallery in dynamic way...!!
Here i made a solution that parses xml from a flikr rss feed and shows this on your browser directly. Here is the xml structure of flikr looks like-
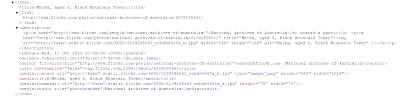
You have to parse media:content and media:thumbnail through your server side code and after this you have to send them to client side of the page.
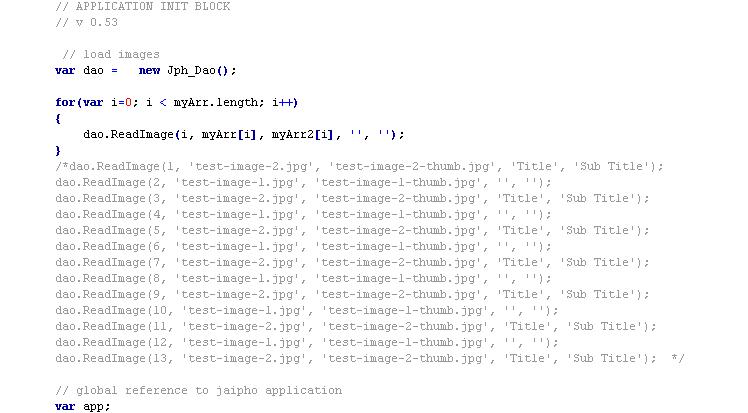
currently if you open index.html file on a editor then you will see the page contain detail of 2 image path and its detail at very end of the page.
 so what you have to do, you have to fill dao.ReadImage( 0,'','','',''); method dynamically through server side code. For this you have to create a ASP.Net atmosphere for your project. So create a new asp.net c# project and at you root directory place all files and directories of JAIPHO that contain all files in same structure.
Now your default.aspx file and index.html file should contain in the same base directory.
The next thing you have to copy and paste all code between and tag from index.html to Default.aspx. Now if you will run your Default.aspx file, it should run normally as your index.html file runs. Add 2 text boxes to the default.aspx page with id TextBox1 and TextBox2.
Next step is to start making code for the parsing of the flikr rss. Here is the way i made-
 the code above grabs thumb and image urls from the rss feed and appends them with a comma (,). After committing the whole for loop, both of your textboxes has comma separated urls of image and thumb image.
Now come to your .aspx file. Comment all lines than contains sets of image path and titles i.e. dao.ReadImage( 0,'','','','');
What you have to do, you have to fill this dao.ReadImage( 0,'','','',''); method dynamically with the comma separated urls from your text boxes. For this you have to fill javascript array will urls at every indexes. So First take the full text of the Textbox into a var type like this. Do this just above the declaration of var dao = new Jph_Dao();
do like this-
now fill array with comma saperated urls-
 doing this, myArr and myArr2 contains urls at all of its indexes.
Now here is the final step. You have to fill dao.ReadImage( 0,'','','',''); with the help of a for loop-
 Now when you run the Default.aspx, this will take images from flikr rss and will execute gratefully.
Really cool way to create a gallery that looks awesome on smart phone.
What if you can create this gallery in dynamic way...!!
Here i made a solution that parses xml from a flikr rss feed and shows this on your browser directly. Here is the xml structure of flikr looks like-

You have to parse media:content and media:thumbnail through your server side code and after this you have to send them to client side of the page.
currently if you open index.html file on a editor then you will see the page contain detail of 2 image path and its detail at very end of the page.

Now your default.aspx file and index.html file should contain in the same base directory.
The next thing you have to copy and paste all code between and tag from index.html to Default.aspx. Now if you will run your Default.aspx file, it should run normally as your index.html file runs. Add 2 text boxes to the default.aspx page with id TextBox1 and TextBox2.
Next step is to start making code for the parsing of the flikr rss. Here is the way i made-

Now come to your .aspx file. Comment all lines than contains sets of image path and titles i.e. dao.ReadImage( 0,'','','','');
What you have to do, you have to fill this dao.ReadImage( 0,'','','',''); method dynamically with the comma separated urls from your text boxes. For this you have to fill javascript array will urls at every indexes. So First take the full text of the Textbox into a var type like this. Do this just above the declaration of var dao = new Jph_Dao();
do like this-
now fill array with comma saperated urls-
Now here is the final step. You have to fill dao.ReadImage( 0,'','','',''); with the help of a for loop-